Rigging 101: How to Inspect Your Standing Rigging for a Safe Voyage
By Stephen Lloyd, The Yacht Rigger
As the saying goes, “A stitch in time saves nine,” and nowhere is that more true than when it comes to your boat’s standing rigging. Your rigging is the backbone of your sailboat, keeping your mast upright and your sails doing what they’re supposed to do—propelling you forward. Whether you’re planning a weekend cruise or a long offshore passage, regularly inspecting your standing rigging is crucial to avoid problems before they start. Here’s a handy guide to making sure your rigging is in shipshape.
Start with the Basics: Visual Inspection
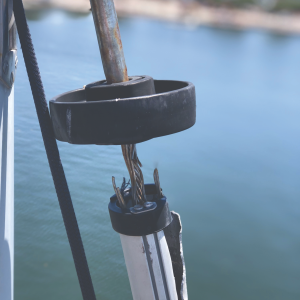
Your eyes are your first line of defense. A visual inspection can reveal a lot, so grab a pair of binoculars and start from a distance. Look up the mast and check for any obvious signs of trouble like kinks, bends, or broken strands in the wire. Move around the boat to get different perspectives. Tip: Also, quickly check that the mast is in column and that the shroud tensions feel somewhat even from side to side. This can help identify any major rigging issues early on. For a more in-depth look at how to properly tune your rigging, stay tuned for a future article where we’ll dive deeper into this process.
If you notice any broken strands or anything that looks questionable during this phase of the inspection, consult with a professional rigger to get assistance with the issue.
 Examine the Chainplates and Deck Fittings
Before you go aloft, start your inspection at the deck level—it’s less risky and can catch potential issues before you climb. Chainplates are critical components that transfer the load from the rigging to the hull. Inspect these fittings where they pass through the deck and are bolted to the hull. Look for signs of rust, leaks, or movement. If you notice any rust stains around the chainplate or on the deck, it’s time for a closer look. Tip: Check under the deck where the chainplate is bolted. Any signs of moisture or corrosion below deck mean there’s likely a problem topside. Also, make sure that chainplates and covers are sealed tightly where they pass through the deck.
Pay Attention to Discoloration, Rust, and the Turnbuckles
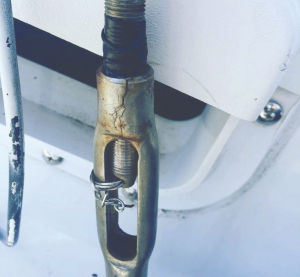
While stainless steel rigging is incredibly durable, it’s not immune to the effects of saltwater. Look for rust or discoloration, especially around the terminals and where the wires enter the swages. Rust can indicate a more serious underlying problem, so don’t ignore it. Discoloration might suggest crevice corrosion, which is often hidden beneath the surface. Tip: Use a rag to clean lighter rust and a light scotch brite pad with stainless polish for heavier rust. Once cleaned, inspect the areas closely for small cracks, as rust can often be a sign of these. Also, check all turnbuckles for signs of wear or corrosion. Make sure the threads are in good condition and the locking devices (cotter pins or locknuts) are secure. If you see any damage or corrosion, replace the turnbuckle. Tip: Grease the turnbuckle threads lightly to prevent corrosion but avoid over-lubricating, as this can attract dirt and cause issues.
Click to read the rest of this story and see more great photos.